
Workshop Content
Before continuing, please complete the Pre-Workshop content to make sure you do not miss any steps.
Part 1: Makerepo
Make an account on Makerepo.com so that you can have access to other people’s projects and the use of our space! Everyone NEEDS one.
Click on the button below to go to create a Makerepo account or to log on to your account!
Part 2: Why Fusion 360?
Fusion 360 allows you to create CAD models using “Sketch Based Modeling”
-
Follows a more common modeling interface similar to Solidworks (Transferable)
-
Allows you to create more complex and dimensionally accurate designs
-
Based on principle of creating a 2D sketch
-
Then transforming 2D sketch into a 3D object
-
Provides you with more freedom in your design
-
Contains features to simulate your design’s motion

You should already set up Fusion 360 and have it downloaded onto your computer from following the Pre-Workshop steps. If you have not done so, please click on the Pre-Workshop tab and complete those steps before continuing.
Part 3: Toolbars and Environment

Top Toolbar:
-
Contains all of the sketch/creation tools required to manipulate models
-
This is also where we can set the environment for Modeling, Rendering, and Simulation functionality
-
Most commonly used Toolbar
-

Bottom Toolbar:
-
Contains the working timeline, allowing you to jump back in time on your design

Data Panel (left):
-
Access your project files here
-
You can create project folders
-
Access to samples
-
You can upload files from here to work on
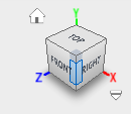
Navigation (right):
-
Drag or select faces on cube to orient object
-
If you are using a mouse
-
Hold Shift + Press Scroll wheel to rotate orientation

Browser (left):
-
Access all elements in work plane
-
Change viewing option for certain sketches/bodies
-
Alter document settings
Part 4: Modeling - Sketch Based

Sketch Tools:
-
Top portion contains all sketching tools to create the base shapes
-
The second section has tools that modify sketches
-
There are also pattern sketch tools which help with making repeating sketches
-
The sketch dimension tool
Sketches need to have “constraints” done using sketch dimension tool, or by placing constraints on certain locations.
Part 5: Sketching

Step 1:
-
Select Model mode and create new sketch
Step 2:
-
Select which of the three planes you want to begin drawing your sketch (TOP)
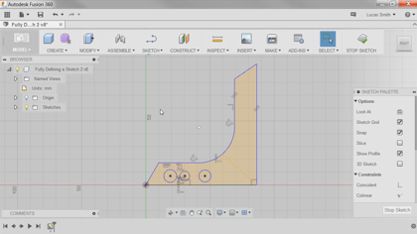
Step 3:
-
Create the sketch below using the following sketch tools:
-
Rectangle, Arc, Circle, Trim, Fillet, Sketch Dimension
-

Part 6: Sketch Extrusion
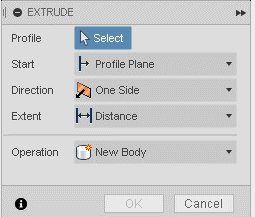
Now to extrude our sketch...
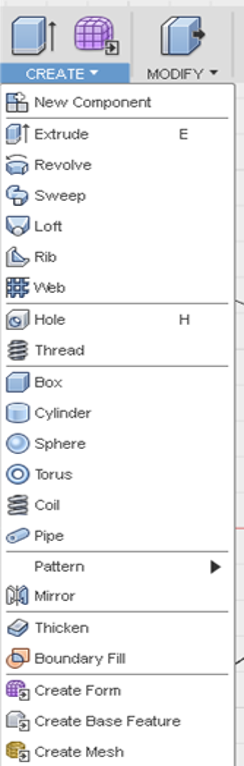
The extrude tool, once selected, will give the following drop down selection menu
- All tools will produce a similar drop down menu (which can be seen below on the left)
- All requirements must be filled in order for the tool to work
The CREATE tab, which can be seen on the right, has all the 3D form features.
-
Extrusion creates a 3D form from the 2D sketch
-
Revolve, Sweep, Loft, Threads are more complex tools that we will NOT be focusing on
-
Modification tab allows you to modify 3D faces (pull them out longer, etc.)


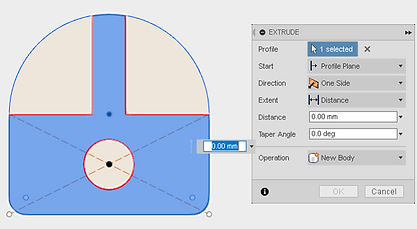
Steps for extrusion
Follow the steps below and refer to the pictures if you require more detail on extrusion. The numbers beside the photos do not necessarily correspond to the numbered steps, the pictures are there to serve as visual aid.
Feel free to test and explore any of the other tools of Fusion 360 as you learn how to extrude a sketch.
Step 1: Select Extrude (e)
Step 2: Select the Profile of Sketch you want to extrude
Step 3: Enter the values for how much you wish to extrude
Step 4: Select Direction (one side vs. two side)
Step 5: Select Operation mode
-
New Body
-
Cut
-
Join
To work on sketches you’ve already extruded double click them, extrude 5mm.
1)
2)

3)

4)

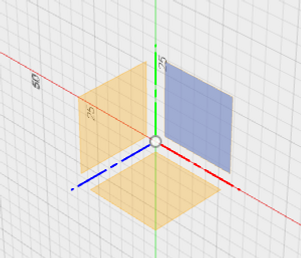
The image below is what your final extruded sketch should look like.
5)

Part 7: Creating a circular pattern
Create the shape that you wish to repeat around this circle
-
Simply draw a 1x2mm rectangle at top centre
-
Use the Trim tool to eliminate unnecessary lines that you don’t want repeating


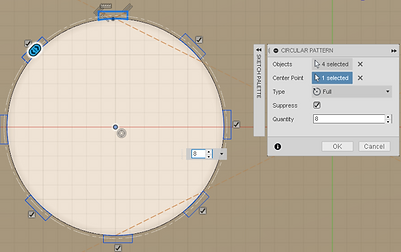
The Circular Pattern tool requires:
Step 1: Selecting Object/s to repeat
Step 2: Choose a centre point for rotation
Step 3: Full/Partial repeating pattern
Step 4: Choose the quantity of repeating objects
Step 5: Select Okay
Step 6: Using the Extrude tool, change the function to cut and remove this pattern sketch


Part 8: Modifying a model

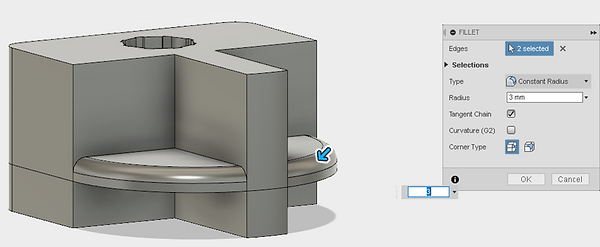
In Fusion 360, you can use the Fillet tool to modify models
Fillet: This tool is used to smooth out/ place a fillet edge on an edge.
These can be added for aesthetic purposes or to reduce stress on an object. The blue arrow below points to an example of how the fillet tool is used.
Part 9: Importing Models
From the Data Panel, select upload and select an STL you wish to work on.
-
Don’t drag the object from here onto work plane as it will add it dimensionless
-
Download STL files from site like Thingiverse
In order to add an STL with keeping its original dimensions choose INSERT>Insert Mesh


Part 10: Assembly
With Fusion 360 it allows you to take your components and then form a full assembly
-
Great for checking your design
-
Must turn Bodies into Components
-
The objects are being joined using different Mating preferences
-
Concentric
-
Plane to Plane
-
Locking
-
-
Once Assembled, you can jump into testing the motion of objects

Part 11: Simulation
Once you have your model fully assembled you can then jump into Simulation:
-
Allows you to apply loads at a certain point on the object
-
Determine the stresses taking place on the object
-
Very good for final prototyping purposes
-
Changing the Materials can also effect how well it performs

Part 12: Expanding your skills
Once you have gotten more comfortable with using Fusion 360 you can do further research as to how to use different sketch tools.
-
More advanced modeling using planes
-
Setting your own planes
-
Revolve, sweep, loft, thread functions
-
Assembly
-
Simulation
Tutorials on how to do these skills can be found on Fusion 360 website as well as through tutorials on YouTube